Lab test setup
Backtesting Limitations
Backtesting results assume perfect execution and zero slippage, which are unrealistic in live markets. Results may not account for all trading costs, fees, or market impact. Historical backtesting data does not represent expected future performance. Users should not rely solely on backtesting when making trading decisions.
This page allows you to define the lab test run and its parameters. The page is divided into two sections: the left section contains the settings, and the right section has two tabs (parameters and results).
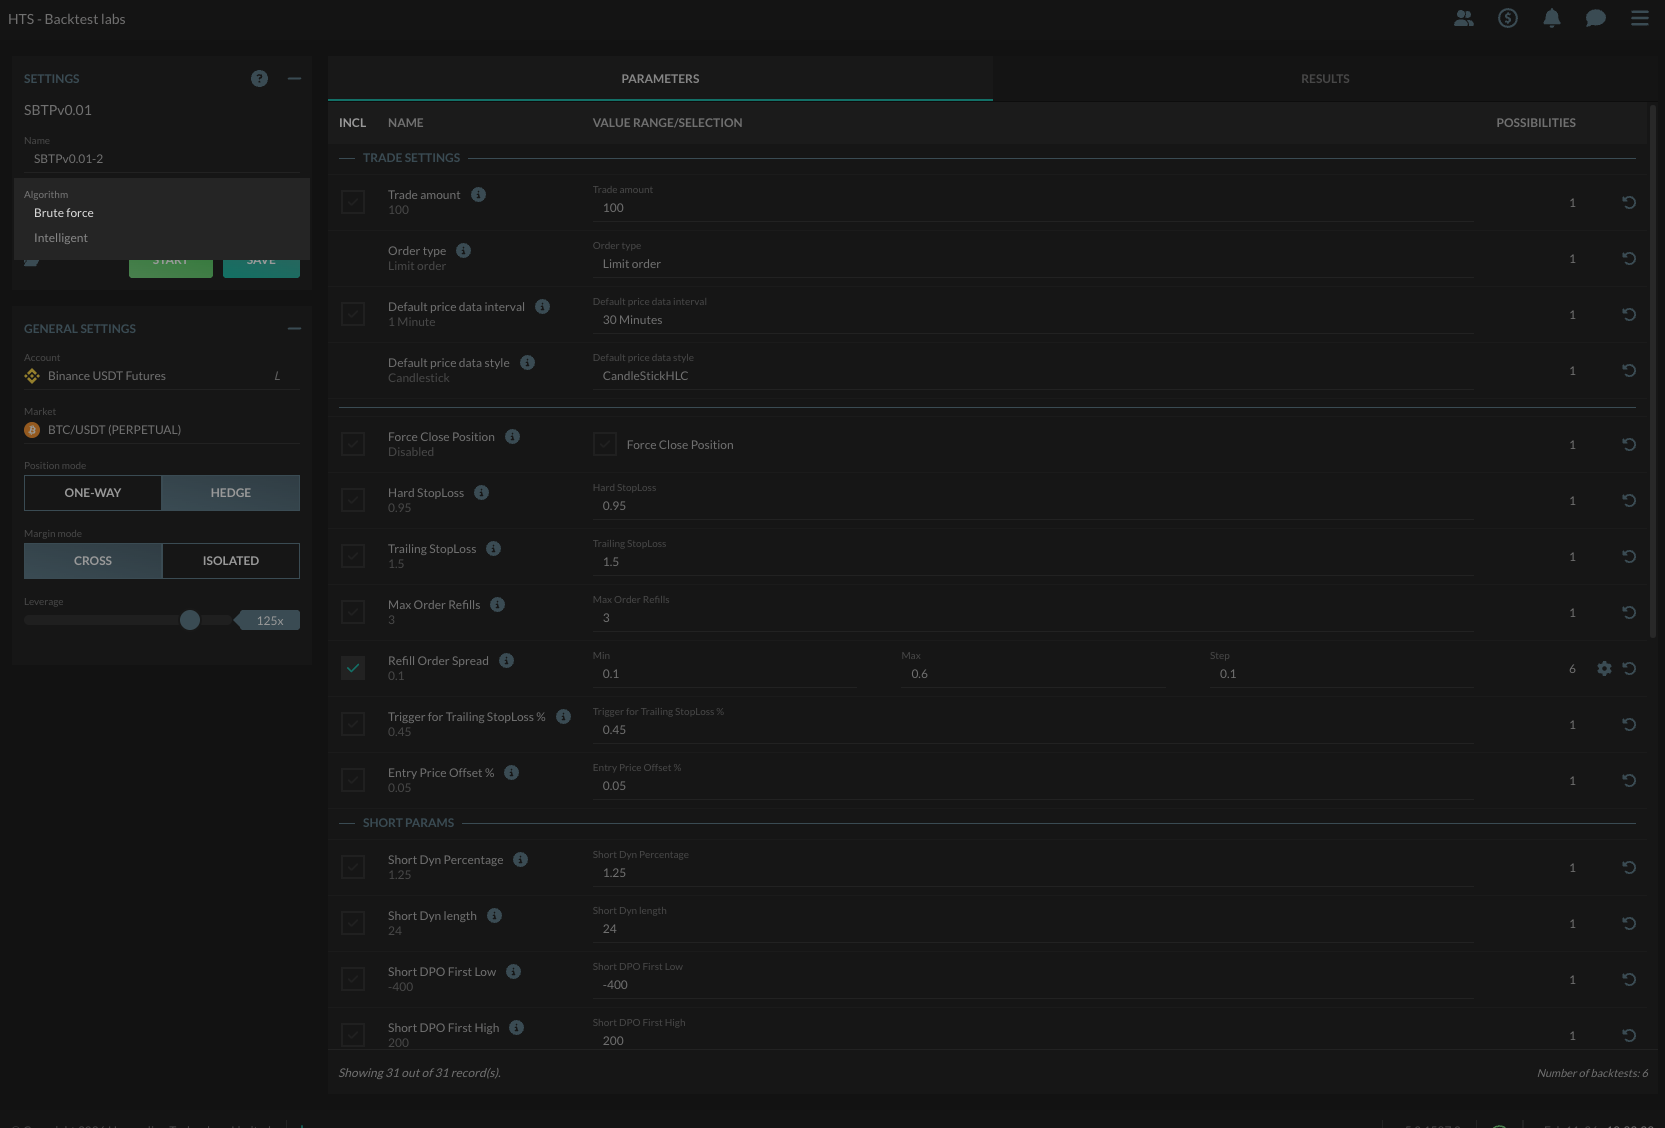
Left Section:
- Name: Enter the name of the test profile.
- Algorithm: Select the Brute Force or Intelligent test execution method.
- Brute Force: Tests every possible combination of parameters. Guaranteed to find the optimal solution but can be slow for large parameter spaces.
- Intelligent: Uses a genetic algorithm to evolve toward optimal parameters. Much faster for large parameter spaces but may not find the absolute best solution.
- Save: Click this button to save the changes to the test profile.
- Start: Click this button to start the lab test profile run.
- Open: Click the icon to show the Script selection window.
- Account: Select your account from the drop-down menu.
- Market: Select the market to test upon.
- Margin mode: Choose between Cross or Isolated margin method.
- Leverage: Set the trading leverage (multiplier) used.
Algorithm Selection:
Choose between two optimization algorithms to explore your parameter space:
Brute Force Algorithm
The Brute Force algorithm tests every possible combination of parameters:
- Pros:
- Guarantees finding the optimal solution
- Deterministic - always produces the same results
- Complete coverage of parameter space
- Cons:
- Can be very slow for large parameter spaces
- Total tests = product of all parameter possibilities
- Best for: Small to medium parameter spaces (< 1000 combinations) where you want guaranteed optimal results
Example: With 3 parameters having 5, 4, and 10 options respectively, Brute Force will test all 5 × 4 × 10 = 200 combinations.
Intelligent Algorithm
The Intelligent algorithm uses a genetic algorithm to evolve toward optimal parameters:
- How it works:
- Generation 1: Creates a random initial population (default: 10 tests)
- Subsequent generations:
- Evaluates fitness of each test (using ROI³ by default)
- Preserves top performers (elites)
- Selects parents weighted by fitness
- Breeds new tests via crossover and mutation
- Repeats for configured number of generations
- Pros:
- Much faster than Brute Force for large parameter spaces
- Total tests = Population × Generations (configurable, default: 10 × 10 = 100 tests)
- Automatically switches to Brute Force if parameter space is small enough
- Converges toward good solutions over generations
- Cons:
- Non-deterministic - different runs may find different solutions
- May not find the absolute best solution
- Still subject to 1000 test maximum (Population × Generations ≤ 1000)
- Best for: Large parameter spaces where you want fewer than 1000 strategic tests instead of exhaustive search
Configuration (SPECIALIST SUPER LAB):
When using Intelligent mode, you can configure these genetic algorithm parameters in the "SPECIALIST SUPER LAB" section:
- Max Population (MP): Number of tests per generation (default: 10). Controls population size for each evolutionary cycle.
- Max Generations (MG): Number of generations to evolve (default: 10). More generations allow evolution to continue longer.
- Max Elites (ME): Number of top performers to preserve across generations (default: 3). These elite solutions have a 20% chance of being selected as parents.
- Mix Rate (MR): Crossover rate percentage. Higher values increase breeding between parents. Lower values produce more random offspring.
- Adjust Rate (AR): Mutation rate percentage. Higher values increase random parameter changes. At least one mutation is always forced to prevent duplicate tests.
1000 Test Maximum
The total number of tests (Population × Generations) cannot exceed 1000. For example:
- ✓ 10 population × 10 generations = 100 tests
- ✓ 20 population × 50 generations = 1000 tests
- ✗ 50 population × 30 generations = 1500 tests (exceeds limit)
Right Section:
- Parameters Tab:
- Incl: Check or uncheck the box to include or exclude testing parameters.
- Name: Displays the parameter name and default value.
- Value range: Defines the test scanning range of the parameter.
- Possibilities: Displays the number of possibilities the given range gives.
- Reset to default: Click this button to restore the default values for a parameter.
- Configure parameter: Click this button to open windows to configure a range of values or specific parameters.
- Results Tab:
- Orders, Trades, Positions, Fee Costs, Profits, ROI, Involved parameters, and Options column: Displays a list of test results.
- Backtest Report icon: Click to open a window showing a summary of the backtest results.
- Backtest Chart icon: Click to open a window showing a candle chart with all the trading moments on it.
- Backtest Log icon: Click to open a window showing the log of the bot created during the backtest.
- Backtest Positions icon: Click to open a window showing a list of all the bot's positions from the backtest.
- Backtest Orders icon: Click to open a window showing a list of all the bot's orders from the backtest.
- Backtest Bot icon: Click to set up a bot.
- Download icon: Click the download button to download the results to an Excel sheet.
Usage:
- Setup Procedure:
- Enter the name of the test and select the algorithm to use:
- Use Brute Force if total parameter combinations ≤ 1000 and you want guaranteed optimal results
- Use Intelligent if total parameter combinations > 1000 or you want faster evolutionary search
- Note: Both algorithms are limited to 1000 total tests maximum
- Select the account and market to test upon.
- Use the parameters tab to set up the settings you want to test.
- Click the Start button to start the lab test.
- Finished Procedure:
- Once the tests have finished, go to the Results tab.
- Search for the record that shows the highest ROI (or your custom fitness score).
- That will be the best setting found by the algorithm.
- For Intelligent mode, consider running multiple times to verify results due to randomness.
- Maximum Tests: Both algorithms are limited to 1000 total tests maximum.
- Brute Force: Limited by total parameter combinations (product of all possibilities)
- Intelligent: Limited by Population × Generations (e.g., 10 × 100, 20 × 50, etc.)
- Maximum Test Length: In the cloud, the maximum length you can test is 1 month. On Enterprise, the maximum length you can test is 12 months.
- You can keep using the HaasBot while the tests are executing.
Info
You can only run a lab test over a period of 1 month if you are using the Cloud. In the Enterprise edition you can run tests up till 12 months.