Setup Discord Notification Bot
This page is a walkthrough guide for connecting the TradeServer Cloud to Discord. Once connected to the Discord server, TradeServer Cloud will create several channels and push your notifications to those channels. These notifications can come from manual orders or bots.
Warning
Do not connect the bot to an existing server. The bot will manage the channels and remove unknown/obsolete ones
Notification overview
Below is a list of the currently available notifications that can be pushed from TradeServer Cloud to Discord.
- Completed orders (bot & manual orders through TradeServer Cloud)
- Cancelled orders (bot & manual orders through TradeServer Cloud)
- Historical orders (data from API)
All Bots
- Activating/Deactivating
- Trade amount error
- Coin/Funds position switch
- Order execution
Message Profile
Each bot has its own message profile that can ignore or push notifications. To edit a message profile:
- Open the bot and click on “Message Profile” under the Quick Links
- Open the context menu on the bot page, list or widget and click on “Message Profile.”
Server Guide
- Open Discord and create a new server \
- Select "Create a Server" and enter a server name.
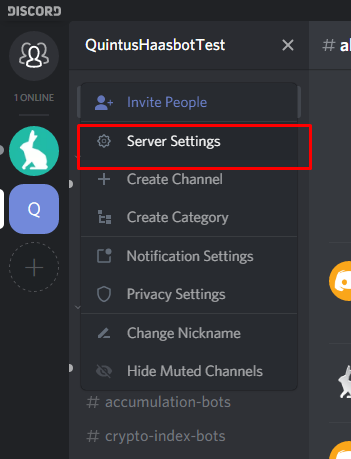
- Open the "Server Settings\
- Go to "Roles" and create a new role\
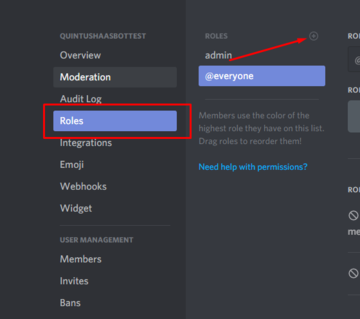
- Enter a name for the new role. E.g., “Bot”
- Enable the following setting:
- Manage Channels
- Manage Messages
- Save the changes and close the settings window.
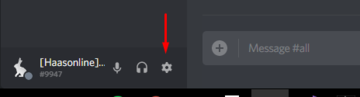
- Open the Discord app settings\
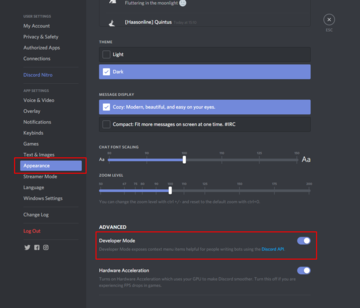
- Go to "Appearance" and enable "Developer Mode."\
- Close the settings page.
Creating a bot
- Go to https://discordapp.com/developers/applications/me and click on “New App.”
- Enter an “App Name” and click on “Create App.”
- Select "Bot" in the left menu and click on "Add Bot."
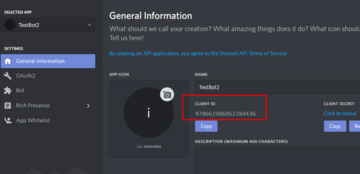
- Copy the following link and replace CLIENTID with your client ID. (Client ID is located in the "General Information" menu) https://discordapp.com/oauth2/authorize?client_id=CLIENTID\&scope=bot\
- Open the link with the replaced CLIENTID and assign the Bot to the server you created in Discord.
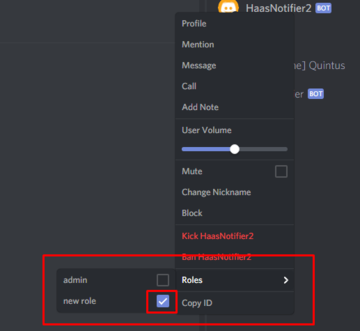
- Right-click on the bot user and add the created role.\
Adding the bot to TradeServer Cloud
- Open the bot on https://discordapp.com/developers/applications/me
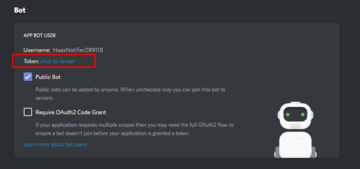
- Open "Bot" in the left menu and click on "click to reveal" next to Token.\
- In HTS, copy and paste this token in the "Discord OAuth Token." (Settings -> Notification tab.)
- Open Discord and go to the created server.
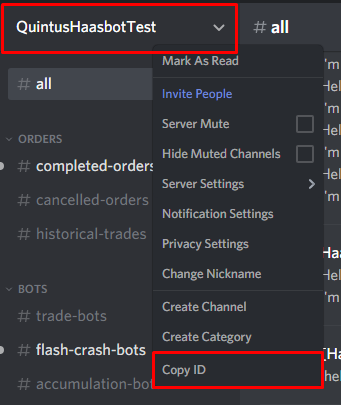
- Right-click on the server name and select "Copy ID."\
- In HTS, paste this in the "Server ID" field in TradeServer Cloud. (Settings -> Notification tab)
- Save the settings. The bot will connect and create channels. A welcome message will be posted in #general.